Milestone XProtect / Mobotix HUB Integration
Milestone XProtect is one of the most popular Video Management Systems. Ultinous AI Suite is able to send alarms to this system so you can manage incidents in your well-known platform.
This guide in its entirety is also applicable to the Mobotix HUB software solution - simply follow the steps laid down below, as you would with Milestone XProtect.
Consult the following table for the different feature sets of Milestone XProtect editions:
| XProtect Edition / Feature | Alarm Manager | E-mail notification | Recording on Alarm |
|---|---|---|---|
| Corporate | ✓ | ✓ | ✓ |
| Expert | ✓ | ✓ | ✓ |
| Professional+ | ✓ | ✓ | ✓ |
| Express+ | ✓ | ✓ | ✓ |
| Essential+ | Limited* | ✓ | ✓ |
*The Essential+ edition does not have the Alarm Manager feature out of the box. Read below on replicating this functionality by manually creating a view.
In order to integrate Ultinous AI Suite in your Milestone XProtect VMS you have to configure three components:
Ultinous AI Suite -> Connector -> Milestone XProtect
Alarm signals will flow in the order as described above. Configuration should be made in the reversed order:
- Setup Milestone XProtect
- Setup Ultinous AI Suite / Milestone XProtect Connector
- Setup Ultinous AI Suite
Note: This guide has been tested on Milestone XProtect 2021 R2 and Milestone XProtect 2022 R3.
Before you start
In this guide it is assumed that Milestone XProtect is installed on a computer in your network and you know how to configure it when using it without Ultinous AI Suite. For further details, please visit the official site of Milestone.
Requirements:
- Cameras are reachable from both Ultinous AI Suite and Milestone XProtect, and Ultinous AI Suite is able to connect to Milestone XProtect.
- Please make sure that each camera is registered in Milestone XProtect which should use Ultinous AI Suite, as described in the Milestone documentation here.
- You have administrator privileges on the device running Milestone XProtect (both for Windows and within Milestone XProtect).
Milestone XProtect
User
Ultinous AI Suite requires access to Milestone XProtect, therefore a new user should be created with administrator privileges.
In the Milestone XProtect Management Client, go to the Site Navigation panel -> Security -> Roles.
Click on Administrators in the Roles panel.

- Find the Users and Groups tab at the bottom of the Role Settings panel. Click the Add... dropdown and select the Basic user option.

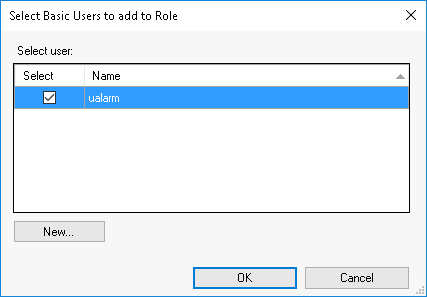
- In the Select Basic Users to add to Role pop-up, click the New button.
- A new pop-up appears. Fill in the form with new user credentials and click OK. Use a complex password with capital and small letters, numbers and special characters. Remember the password, because it will be used later in the Connector.
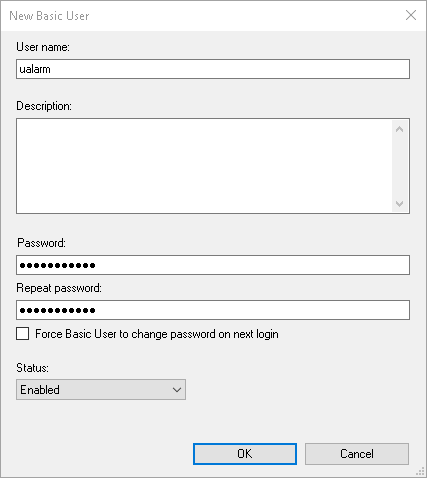
- Add this basic user to the Administrators by clicking OK.
Event
- In the Milestone XProtect Management Client, open Tools in the upper menu bar -> Options -> select the Analytics Events tab.
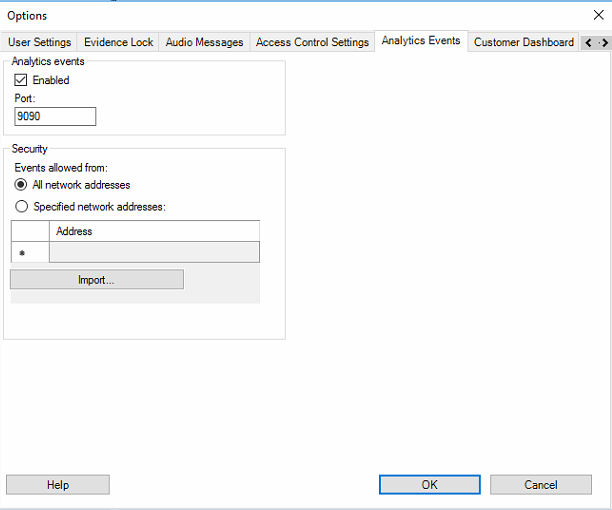
Under Analytics events, tick the box beside Enabled then press OK.
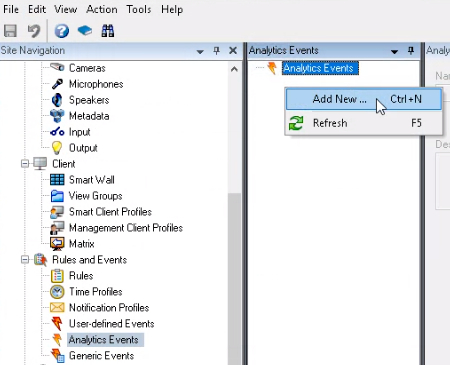
In the Site Navigation panel, go to -> Rules and Events -> Analytics Events.
Right click on the Analytics Events panel -> Add new.
The name must be
U-Alarm. It is very important to set this exact name without the dot or any white spaces.Optionally, you may set a name that corresponds to the type of alarm you are trying to connect, e.g.
intrusion. Custom names may be used for differentiating between your alarms, if there is more than one. Note that setting a name other thanU-Alarmwill require an additional step later on.Click the Save button in the top left corner.
Recording Rule
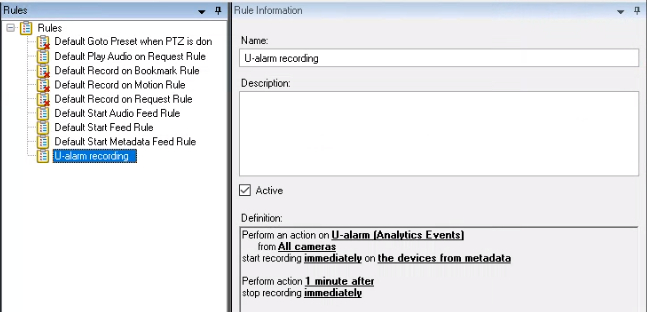
If your system is not recording continuously, it is recommended to start recording on each triggered alarm. A Rule should be created for this purpose.
Tip: If your system has a custom recording logic, you can skip this step.
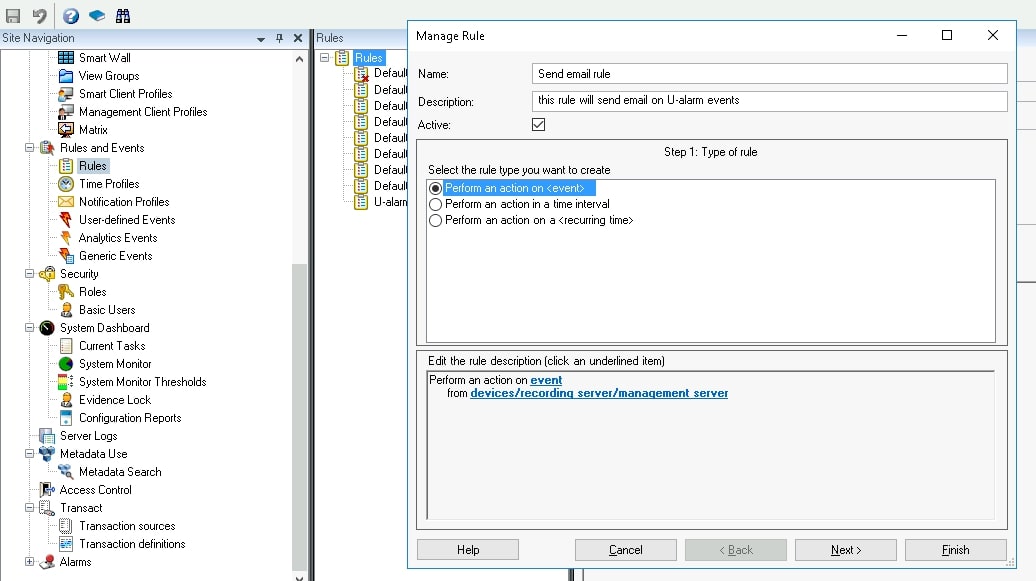
In the Milestone XProtect Management Client, go to the Site Navigation panel -> Rules and Events -> Rules.
Right-click on the Rules panel -> Add Rule
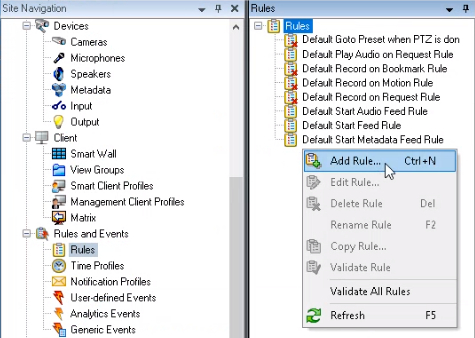
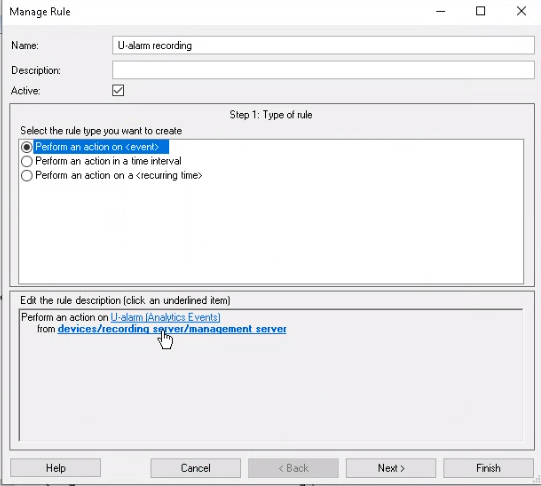
Set any Name.
As the Type of rule, select Perform action on event. Click on the blue underlined "event" word in the lower panel.

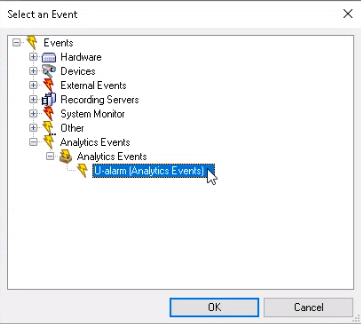
- In the pop-up select Events -> Analytics Events -> ... Ultinous AI Suite. Click OK.
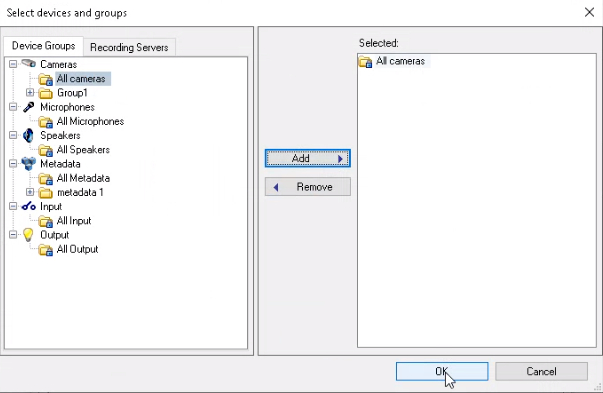
- Click on the blue underlined "devices/..." line in the lower panel (after "from").
- In the pop-up select Cameras -> All cameras. Click the Add button. Click OK.
Click Next.
Skip the Conditions Step (2). Click Next again.
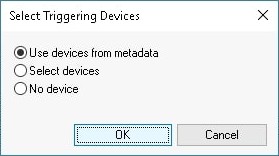
In the Actions Step (3) select Start recording on devices. Click on the blue underlined "recording device" words in the lower panel.
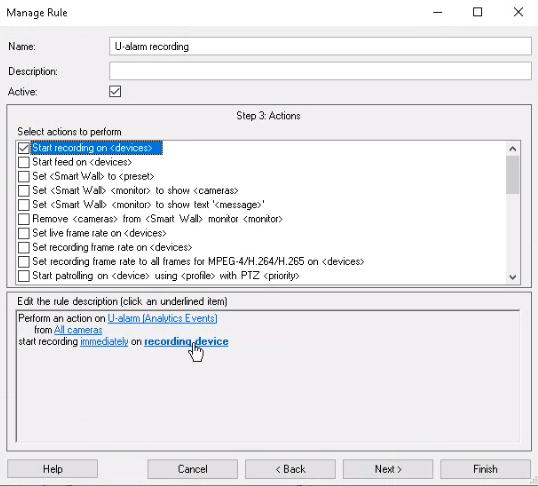
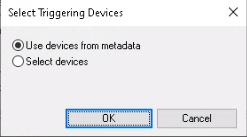
- In the pop-up select Use devices from metadata. Click OK.
The recording will start immediately on alarm. You can set other (even negative) values by clicking on the blue underlined "immediately" word in the lower panel.
Click the Next button.
In the Stop Criteria (4) step, select Perform stop action after time. Click the blue underlined "time" word in the lower panel and set the length of the recordings. Click OK.
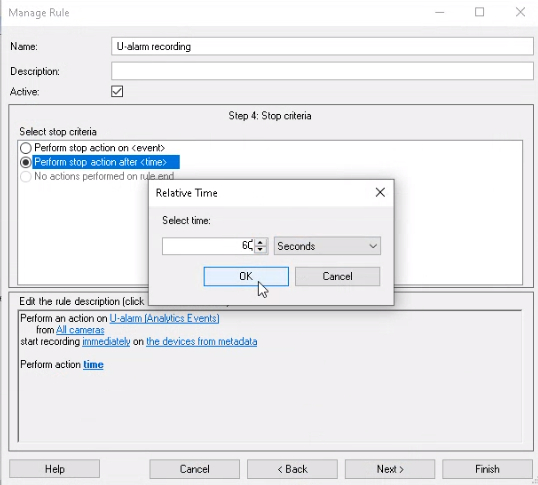
Click Next.
Skip the "Stop actions" (5) step. Click Finish. The new rule is created.
Alarm
Receiving alarms in the Alarm Manager
Now an Alarm has to be configured in Milestone XProtect.
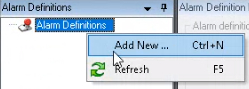
In the Milestone XProtect Management Client go to the Site Navigation panel -> Alarms -> Alarm Definitions.
Right-click on the Alarm Definitions panel -> Add new.
Fill the form. Make sure that the alarm is Enabled.
Set any Name for the alarm.
This alarm will represent all notifications which come from Ultinous AI Suite.
Set the Triggering event to Analytics Events, then set Ultinous AI Suite in the drop-down list below.
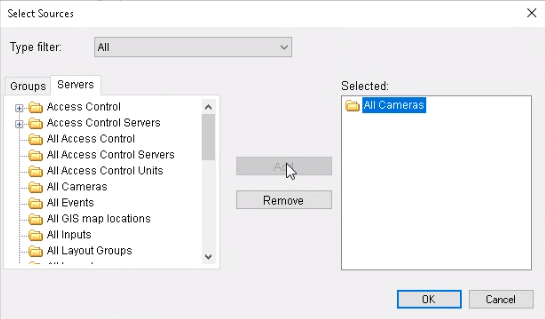
At the Sources setting, click the Select... button. A pop-up will appear.
Click on the Servers tab. Select the All Cameras node and click the Add button. Click OK.
If you are familiar with Milestone XProtect, you can configure the rest of the settings as you wish or you can leave them as they are.
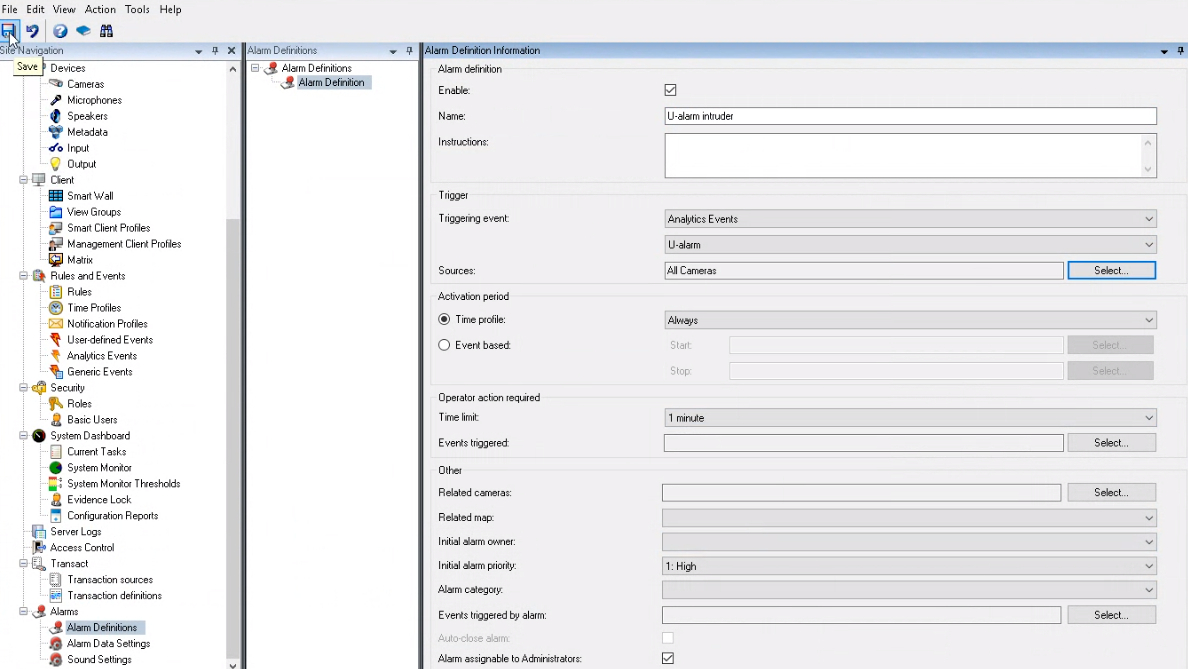
- Click the Save button in the top left corner (once enabled).
All done. You will receive alarms in the Alarm Manager.
Receiving alarms by e-mail
Besides the Alarm Manager, Milestone XProtect has an additional way of viewing received alarms: in e-mail format with optional image and/or video attachments.
Follow the steps below to have a working e-mail notification setup.
Mail server
- In the Milestone XProtect Management Client, go to Tools in the upper menu bar -> Options -> Mail Server.
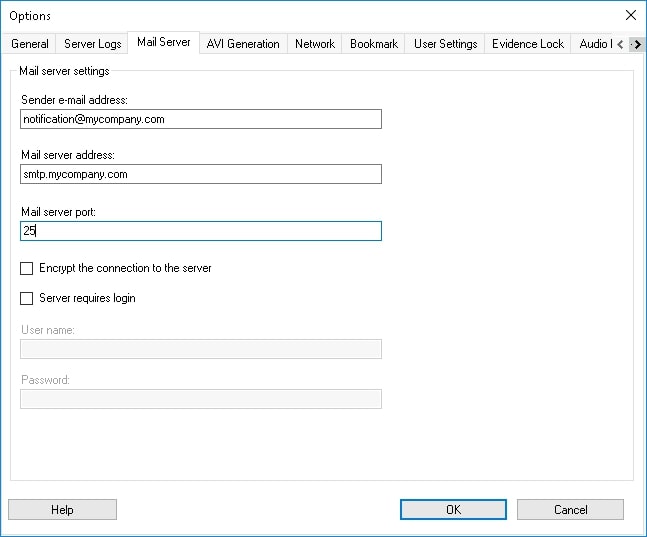
- Type in the sender address.
- Type in the smtp address of the sender in Mail server address.
- Click OK.
Notification Profile
Now let us create a profile for sending the e-mail notifications.
- In the Milestone XProtect Management Client go to the Site Navigation panel -> Rules and Events -> Notification Profiles.
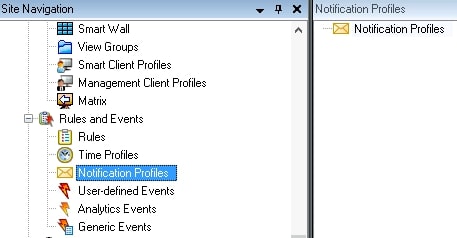
- Right-click on the Notification Profiles icon in the right-side panel -> Add new.
- Set Ultinous AI Suite email as the Name of the profile. You may fill the Description field as well (optional).
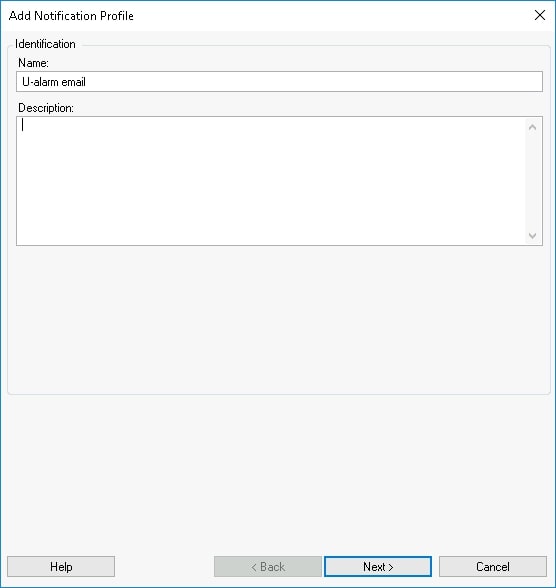
- Click Next.
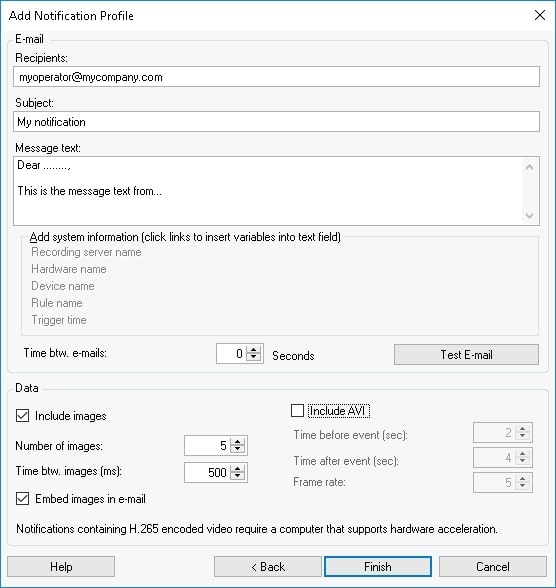
- Fill in the Recipients field with the e-mail addresses of your recipients, separated by semi-colons.
- Set any name for the e-mail Subject.
- Type in any text for the e-mail.
Optional:
By clicking on any of the items under Add system information, the e-mail body will automatically include them as additional information. You may also set a minimum time interval between the e-mails sent, in seconds.
Under Data, you may add and configure images and videos (the latter in AVI format) of the alarms by ticking their respective boxes. You can include the images as attachment, or embedded in the e-mail by ticking the Embed images in e-mail box.
- If you would like to test the settings you just configured, click Test E-mail.
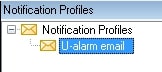
- Click Finish to save the profile, which will appear under Notification Profiles of the Site Navigation Panel.
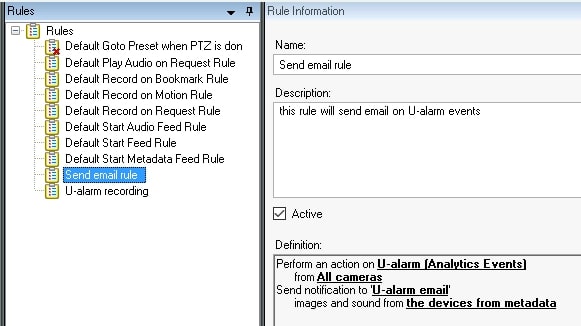
E-mail Rule
- In the Milestone XProtect Management Client, go to the Site Navigation panel -> Rules and Events -> Rules.
- Right-click on the Rules panel -> Add Rule
- Set any Name.
- In the Type of rule Step (1), select Perform action on event. Click on the blue underlined "event" word in the lower panel.
- In the pop-up, select Events -> Analytics Events -> ... Ultinous AI Suite.
- Click OK.
- Click on the blue underlined "devices/..." line in the lower panel (after "from").
- In the pop-up, select Cameras -> All cameras. Click the Add button. Click OK.
- Click Next.
- Skip the Conditions Step (2). Click Next again.
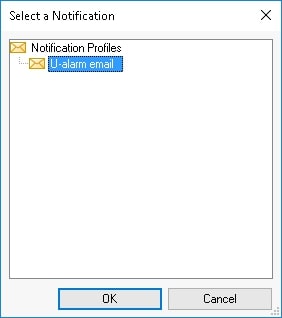
- In the Actions Step (3), select Send notification to profile. Click on the blue underlined "profile" word in the lower panel.
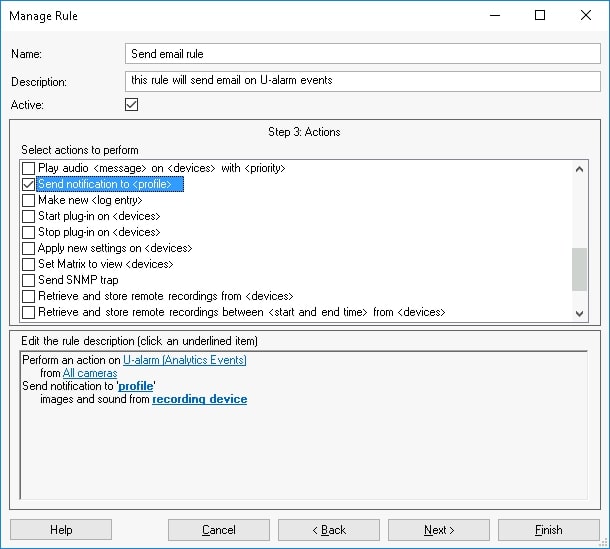
- In the pop-up, select Ultinous AI Suite email, under Notification Profiles. Click OK.
- Click on the blue underlined "recording device" word in the lower panel.
- In the pop-up, select Use devices from metadata. Click OK.
- Click the Next button.
- In the Stop Criteria (4) step, select No actions performed on rule end.
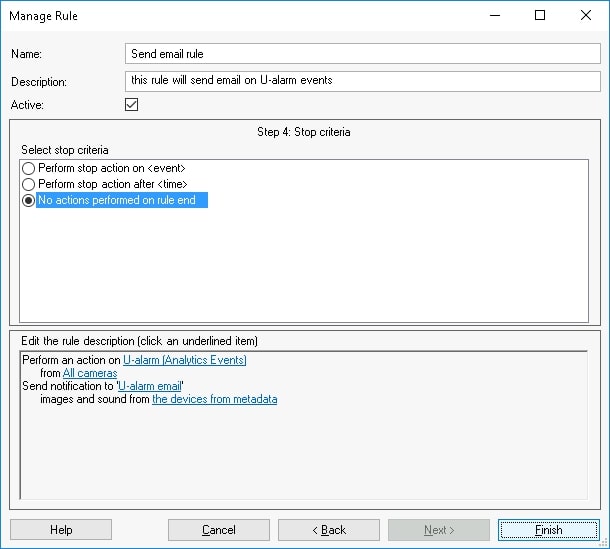
- Click Finish. The new rule is created and Milestone XProtect is ready to send alarms via e-mail from Ultinous AI Suite.
All done. Recipients will receive emails upon a triggered alarm.
Connector
Compatibility
The latest version of Milestone XProtect Connector is backward compatible with Ultinous AI Suite releases older than 3.1.0 - it is therefore recommended to upgrade the Connector, as described below.
Upgrade Connector to 6.0.0
Close the Connector.
Uninstall the Connector.
Proceed to the next section.
NOTE: The Connector cannot use Windows credentials any more, therefore you must create a Basic User in Milestone XProtect with Administrator privileges.
Install
- Download Ultinous AI Suite - Milestone XProtect Connector installer.
- Install it on the computer which runs Milestone XProtect.
Configure the Connector
Start the Connector service. Look for the Connector's icon on your system tray.
The connector icon indicates the following states:
 Running
 Pending
 Stopped
Double click its icon in the system tray to open the Connector's settings.
Port: The Connector uses port 10000 by default. Optionally you can set a different unused Port for the connector when the Server status is Stopped.:
Click the Stop Server button. This will enable the Port setting.
Set any other unused Port number.
NOTE: Please make sure your Windows Firewall on Connector's server is configured properly (enable communication through TCP 10000 port) or turned off.
NOTE: Remember the static IP address of this machine and the port you have set for it will be used in Ultinous AI Suite later.
Milestone URL: set the Milestone XProtect server's address.
User and Password: set the Milestone XProtect credentials you have created before.
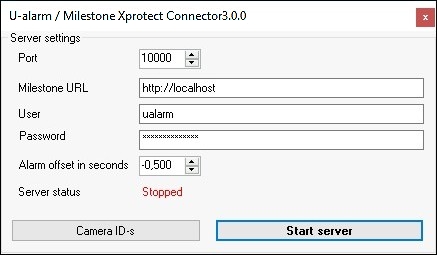
- Click the Start Server button. The Server status will change to Running.
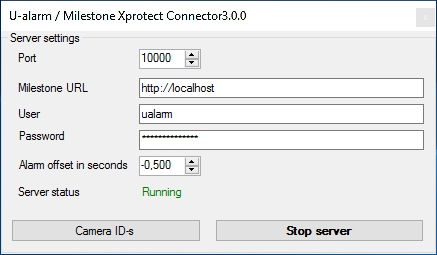
- Everything is set. You can close the window - the service will continue running.
Additional information:
- You can always stop or restart the service by right-clicking on the tray icon and selecting the Stop/Start server option.
- To re-open the settings view to modify the connection or credential settings double click the tray icon.
- On the settings view, you can always check the cameras registered to Milestone XProtect with their GUID. Click the Camera ID-s button for this list. Note that you must close and reopen the list dialog whenever you add (or remove) more cameras to Milestone XProtect.
- You can configure an alarm time offset in seconds. The default value is -0.5 seconds.
Ultinous AI Suite
Now Ultinous AI Suite can be configured as described in the User's guide, with a few extra steps. Please come back to this article after you have finished setting up Ultinous AI Suite.
Cameras
Each camera's Technical name in Ultinous AI Suite should match its GUID in Milestone XProtect. Camera GUID's can be obtained from either the Connector or from Milestone XProtect.
How to get the GUID
Option 1: Get the GUID from the Connector
- Open the Connector.
- Click on the Camera ID-s button.
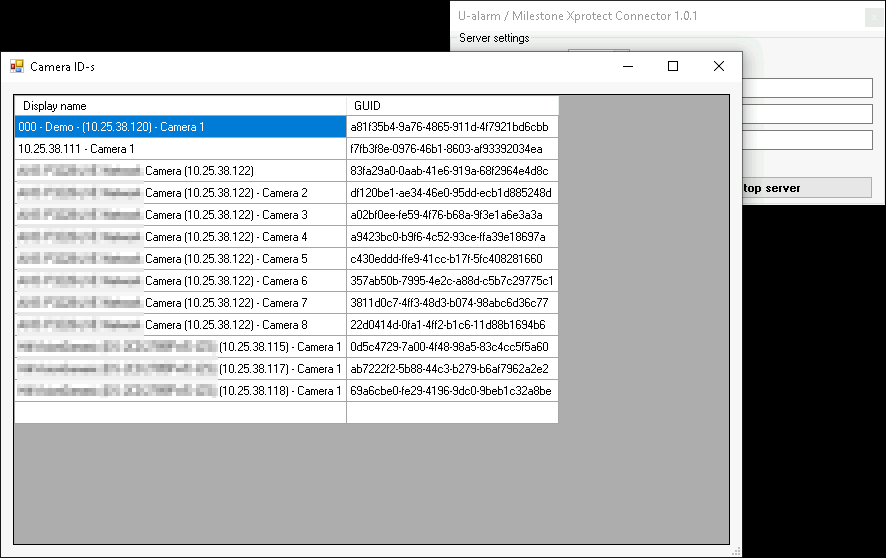
- Copy the GUID of the respective camera.
Note: In this version, the camera list cannot be refreshed unless you close and reopen the list's window.
- Paste it in Ultinous AI Suite as the Technical name. Please create or update each camera setting in Ultinous AI Suite accordingly.
Option 2: Get the GUID from Milestone XProtect
- In the Milestone XProtect Management Client, go to the Site Navigation panel -> Cameras.
Note: This can be a little bit tricky so please follow this guide carefully.
- In the Devices panel, find the Cameras root node and click on it.
- Now (without clicking anywhere else) hold CTRL key and click on the specific camera.
- In the Properties panel on the right, under the Info tab, you will find the ID (GUID).
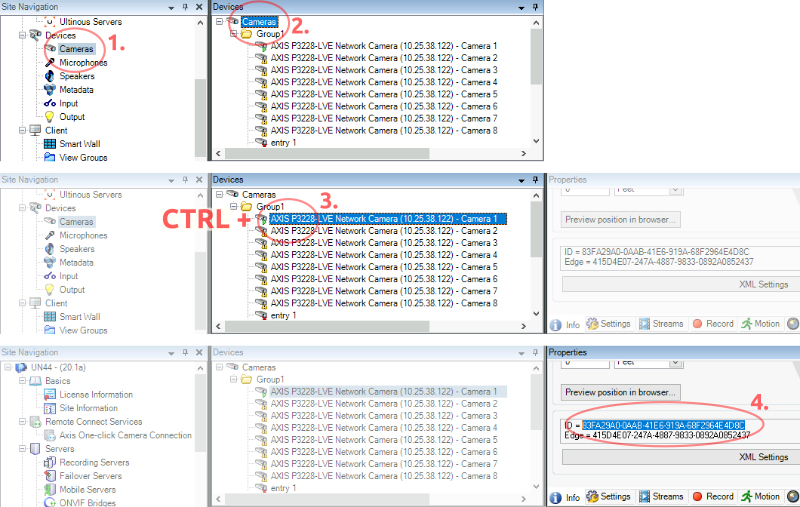
- Select the ID value and copy it to your clipboard.
Note: Make sure that you don't copy any leading or tailing spaces. It is recommended to create a note about these ID-s.
- Paste it in Ultinous AI Suite as the Technical name. Please create or update each camera setting in Ultinous AI Suite accordingly.
Solutions
Edit an existing Solution or create a new one in Ultinous AI Suite.
Enable HTTP webhook in the form by ticking its button.
Set the Target URL to the Connector's address using the location and the port you have memorized before, e.g.
http://192.168.1.123:10000If you have set a custom name for your event in Milestone (Step 4 under Event): Under Headers, type
x-xprotect-event-nameas the Key. As Value, type the name you set for the event in Milestone - in this example,intrusion. (Note that filling in these fields automatically registers them - you do not need to press the +Add button in this case.)Note that this is only required if you have set a custom event name in Milestone - otherwise, skip this step.
Submit your settings.
Receiving alarms in Milestone XProtect
There are two ways of sending and managing alarms from Ultinous AI Suite: through the Alarm Manager, or alternatively, via e-mail, using the built-in e-mail notification feature of Milestone XProtect.
NOTE: As of now, the Alarm Manager is only available out of the box in editions Express+ and above. In Essential+, receiving alarms are possible either by E-mail notification or by manually creating a view to replicate the functionality of the Alarm Manager.
Alarms through the Alarm Manager
Whenever an Alarm is triggered by Ultinous AI Suite, it should be visible in Milestone XProtect Smart Client under the Alarm Manager tab with annotations.

The metadata in the alarms:
- Name: The name of the alarm in Milestone XProtect.
- Message: Ultinous AI Suite (cannot be changed).
- Type: The name of the alarm in Ultinous AI Suite.
Alarms via E-mail
Recipients are receiving alarms according to the E-mail notification settings.
Creating a custom view in Smart Client
This method could be useful if using the Essential+ edition of Milestone XProtect, which lacks the Alarm Manager - follow the steps below to replicate its functionality. In editions above Essential+, you do not need to do this.
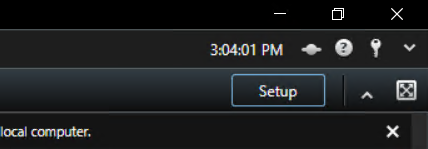
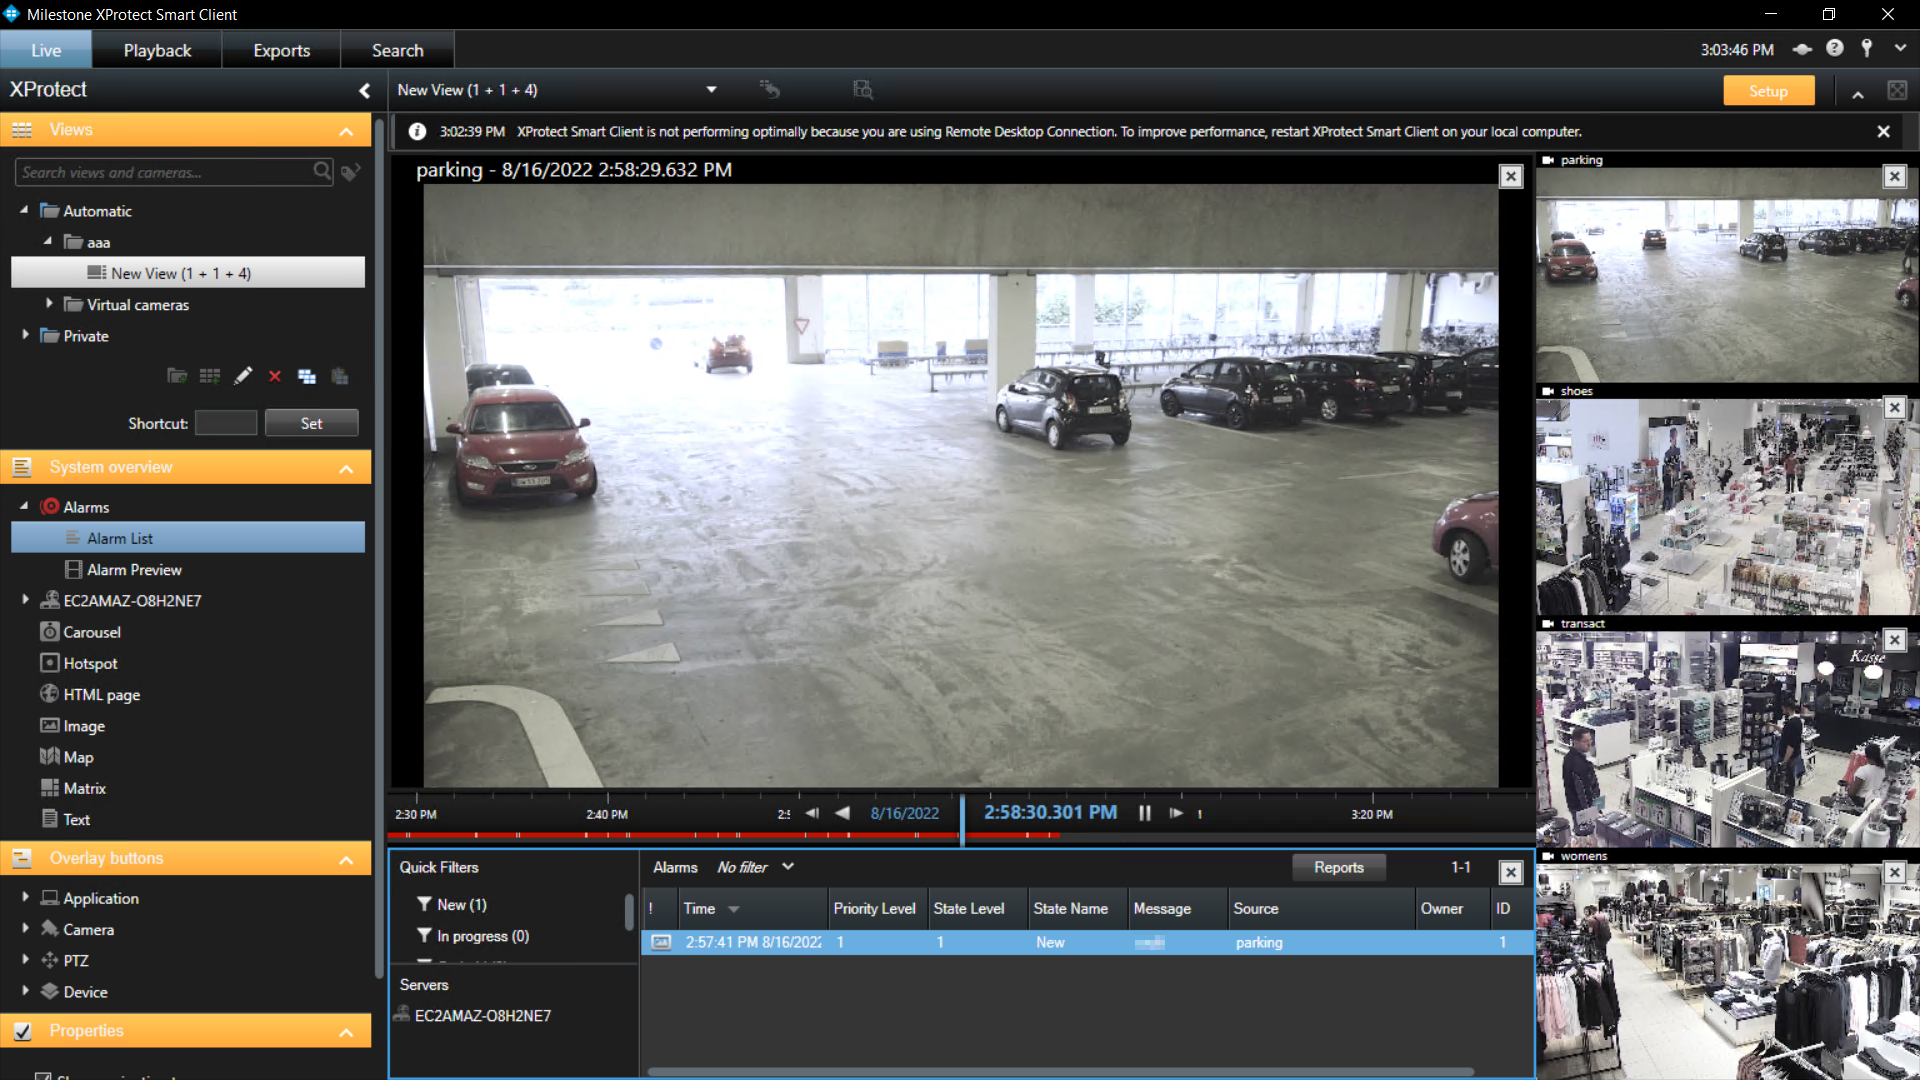
- In the Milestone XProtect Smart Client, open the LIVE tab of the window.
- Click the Setup button in the upper right corner of the window -> Certain elements of the interface will turn orange, indicating that they are now editable.
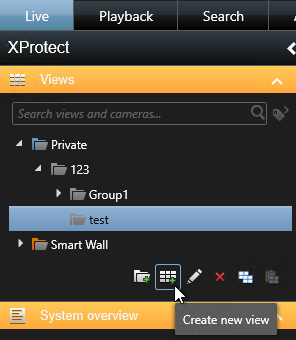
- On the left sidebar, select a View Group -> click Create new view. Choose any layout that contains at least one wide rectangle; in this example, layout 1+1+4 under category 4:3.
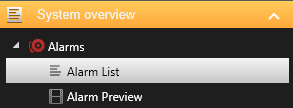
- On the left sidebar, under System overview, open Alarms -> click and drag the Alarm List and Alarm Preview items into the wide rectangles you created in the above step (into the two left-side rectangles in our example of a 1+1+4 grid).
From the Camera menu on the left sidebar, drag any cameras of your choosing into the remaining rectangles.
Click the Setup button in the upper right corner of the window to exit editing and save your changes to the interface.
Receiving annotated RTSP streams in Milestone XProtect
In the Milestone XProtect Management Client, go to the Site Navigation panel => Servers => Recording Servers.
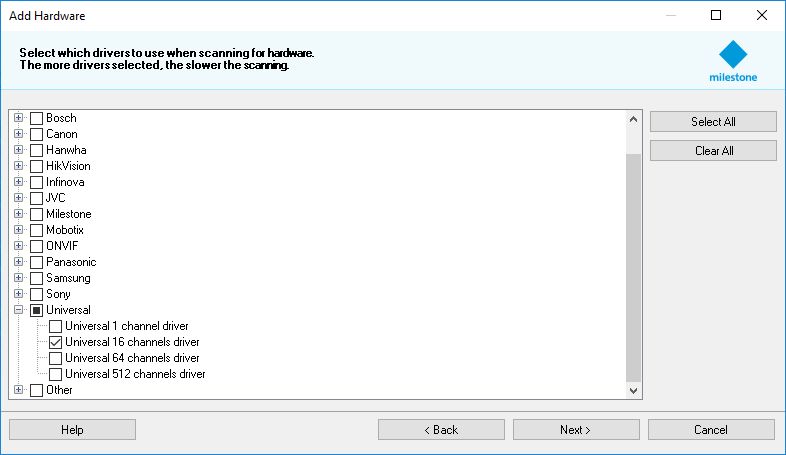
Select Recording Server, then right click on it => Add Hardware.

In the pop-up window, select Manual. Click Next.
Set the user as
ualarmand paste the API token you generated as the password. Click Next.Click Clear All in the right side of the panel => Scroll down to Universal, then open it => Tick Universal 16 channel driver. Click Next.
- Type the IP address of the AI Suite box in the Address field (without the
http://part). Under Hardware Model, click the (Auto-detect) field, then choose Universal 16 channel driver. Leave the rest of the fields as default. Click Next.
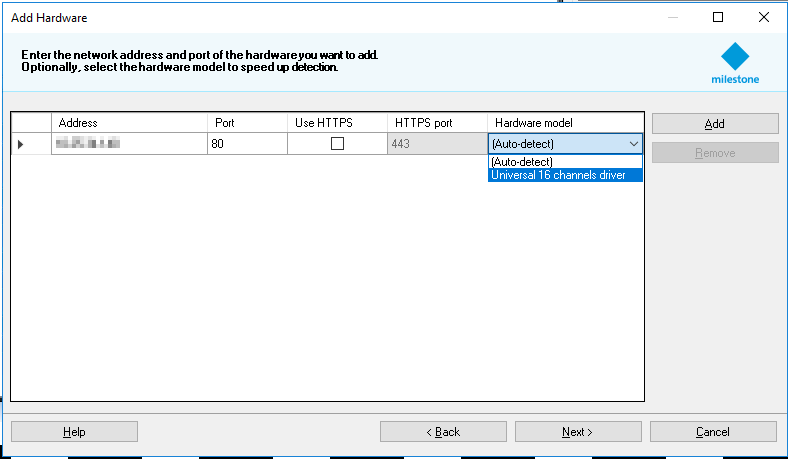
- On the next screen, your hardware should automatically be detected by the client. Click Next.
- The client will collect information about your hardware. Once the progress bar has finished, click Next.
- You are now presented with a list of Camera and Microphone (optional) ports - tick as many of them as you have registered in the AI Suite (one in the example image). Click Next.
Make sure to tick the Hardware entry itself as well!

- Now you may assign your newly added cameras to a camera group. You can do so by clicking the yellow folder button, then click the Add Group button. Create a new group, then click OK.
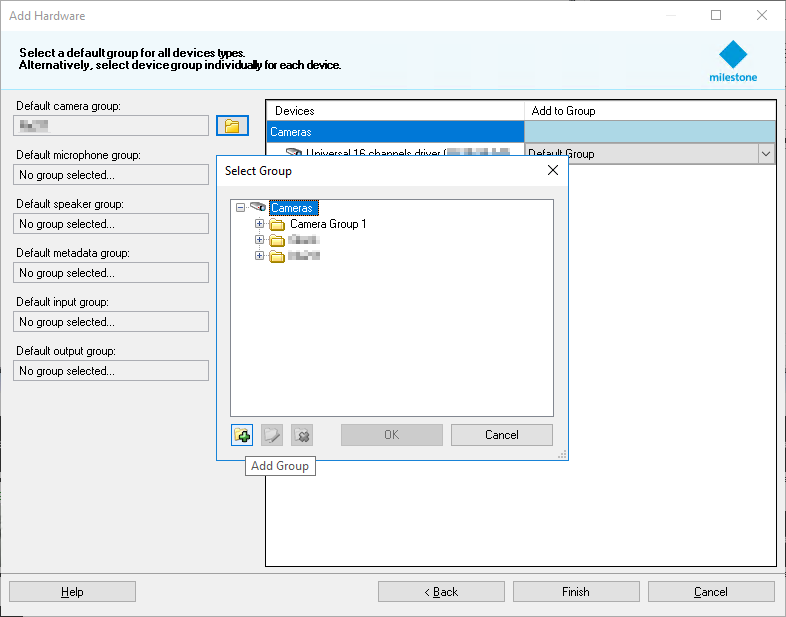
- You should see your newly created group selected as default. Click Finish.
- Go to the Site Navigation panel => Servers => Recording Servers. A new hardware entry has appeared, named by default Universal 16 channel driver - \<IP Address>. You may double click on it to set a custom name.
- Click the + button to expand your list of added cameras. Then do the following for each of your cameras:
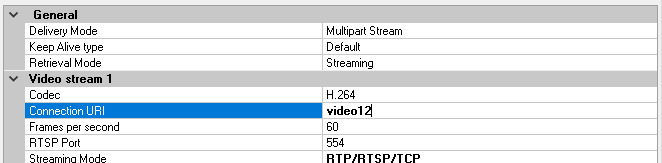
- Click on your camera => its Properties tab should appear on the right side of the screen. Under Video stream 1, set the following entries:
- Connection URI: Type the
video<number>part of the RTSP URL generated by the Video Output corresponding to your camera. For example:video12. Press Enter on your keyboard. - Streaming Mode: Click on the entry and choose RTP/RTSP/TCP from the list. Press the Save button on the top left corner of the Milestone XProtect window or press Ctrl+S on your keyboard.
- Repeat Step 14 above for each of your registered cameras.
Once you have all your streams registered in the Milestone XProtect Management Client, you may view their output in the Milestone XProtect Smart Client.
Troubleshooting
Ultinous AI Suite Connector can not be started
- Please make sure that the location of Milestone XProtect server is available
- Please make sure that the Milestone XProtect credentials are correct and the user has Administrator privileges in Milestone XProtect.
Milestone XProtect does not receive alarms from Ultinous AI Suite
- Please double check all settings in Milestone XProtect.
Please check whether:
- The Ultinous AI Suite Connector is running
- If not, please start the Connector and make sure that it is in RUNNING state.
- Milestone XProtect credentials are set well in the Connector.
- Please update the credentials if needed.
- The window firewall is off or the communication is enabled so the location and the port is accessible for Ultinous AI Suite.
- If these settings are fine, it means that Ultinous AI Suite Connector does not receive alarms from Ultinous AI Suite. Please proceed to the next issue.
Ultinous AI Suite Connector does not receive alarms from Ultinous AI Suite
- Please make sure that the network location of the connector is set well in Ultinous AI Suite's Solution.
- Please double check that your camera's Technical name in Ultinous AI Suite matches its GUID in Milestone XProtect.
- Under Events in Ultinous AI Suite, please check whether Ultinous AI Suite detects incidents. If you can not find a recent record, it means Ultinous AI Suite does not trigger alarms. In this case, please proceed to the next issue.
Ultinous AI Suite does not trigger alarms
- Please double check the configuration of your Solution in Ultinous AI Suite, especially the Sensitivity and the Filter Area (ROI) settings.