PPE (Personal Protective Equipment)
The personal protective equipment, or PPE detection triggers an alarm if the person(s) detected are not wearing either a protective helmet, a visibility vest, or both.
NOTE: A single alarm tracking either vest or helmet (not both) takes up 17 to 52 analysis slots by default (minimum 17), depending on the number of analysed people configured. Tracking both types of equipment with a single alarm requires 17 to 89 slots (minimum 17). [Read below to learn more about Analysis speed].
- Core technology: full body detection.
- A camera with a minimum of 6 FPS is required!
- Takes up a minimum of 20 analysis slots.
- Compatible with fixed, PTZ, and thermal cameras.
- Areas of interest can be defined.
- Send data to third-party software.
New PPE
Select PPE by clicking on its box. Fill in the form, as follows:
Name: A readable name of this alarm. This name will appear in the Events view and in all notifications.
Armed: The alarm can be deactivated here. Armed by default.
Schedule (optional): You can associate one of your previously defined Schedules with this alarm.
Cooldown (seconds): After an alarm is triggered, it won't be triggered again for the specified duration. Minimum value is 5 seconds.
Note that cooldown is applied individually, for each tracked object - if a new, untracked object enters the area, analysis will always occur regardless of the time set here (therefore no detections will be missed).
Add Camera: Select a camera from the list.
NOTE: Cameras below 6 FPS will not show up on the list of cameras for PPE!
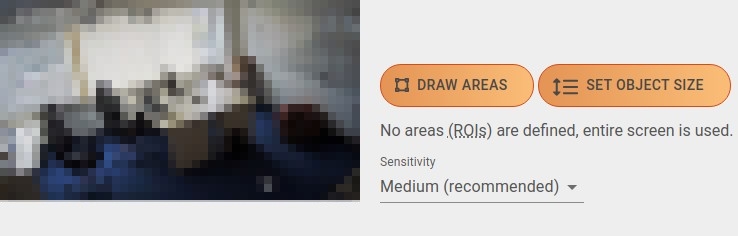
- Draw Areas (ROI) (optional): Sometimes the alarm should be limited to a specific area of the video. If you would like to observe only a specific area, it can be determined here. Clicking this button makes the Camera Editor appear. Without ROI, the entire area will be observed.

Set object size (optional): If you have a good idea of what pixel range the detected objects would fall into, you can customise the minimum and maximum height size of detections, in pixels, here. This would ensure that only objects that fit into that range would get detected, resulting in a further decrease in the number of false alarms.
Move the the arrows by clicking and dragging them to help you determine the optimal values. Adjust the slider's endpoints on the bottom part of the screen to set the minimum / maximum values. Click Set sizes to save your changes, or Discard to cancel them.
NOTE: Take care that any object below or above the set range will NOT be detected, possibly resulting in missing incidents. It is good practice to set the minimum size slightly below, and the maximum size slightly above the desired amount.
For example: If using Ultinous AI Suite with a combination of radar and PTZ cameras, setting custom object sizes would result in detections only if the radar have detected movement - since setting the proper minimum size would rule out random noise causing false detections.
Sensitivity: The sensitivity of the detector can be fine tuned here. Lowering the sensitivity causes less false detections but decreases accuracy. Increasing it results in more alarms but may cause more false detections as well. The default sensitivity is Medium.
Selected personal protective equipment: Choose one or both types of PPE to trigger alarms if the person(s) detected are not wearing them.
Analysis speed: The maximum number of people analysed at the same time. Note that the more people the analysis is run on, the more Analysis slots the Solution will use. The default settings are Person limit: 4.
Click the Submit button to save your settings or proceed to Integration.
Integration (optional)
Ultinous AI Suite offers a wide range of possibilities when it comes to integration with third-party services. Follow the links below to read their respective entries in the guide.
HTTP webhook (Milestone XProtect or custom solution via alarm API) Enables / disables event sending: Use this feature to send triggered events to a third-party software with an optional snapshot image of the incident attached. Sends a HTTP POST request to the URL set below, with a content type of
application/json. Read on to learn about the schema formatting.The following information should be provided by the third-party software's administrator:
- Target URL: The location of the API.
- Header keys and values: Key and value of custom HTTP header. Click the Add button to add more Keys. To delete a Key, press the Trash icon next to it.
- Trust all certificates: If enabled, HTTPS certification errors will be ignored.
NOTE: Custom CA certificates can be uploaded in the Control Panel, under Trusted Certificates.
- Enable snapshot attach (not applicable to Milestone XProtect): Off by default. If enabled, it fills in the
snapshotfield of the HTTP message schema in base64 encoded format. - Send Test Event: To test your integration, click the Send Test Event button once the HTTP webhook settings are set.
SMTP or Central Station Monitoring software
