Sentinel Integration
Sentinel by Monitor Computer Systems is a Central Station Monitoring (CSM) software, capable of integrating with other solution. Follow the guide below to be able to view data from AI Suite within Sentinel's interface.
Create user in Sentinel
In the upper menu bar, select Customer -> New Customer.
Select Create a single site and click OK. A pop-up window will appear.
Under Step 1: click the No radio button.
Under Step 2:
Type: Click the empty field and select Generic Line Interface from the list.
Receiver ID: Click the empty field and select GenericLine.
ID: Click the Find Next button to the right of the second ID field -> Copy the newly generated ID.
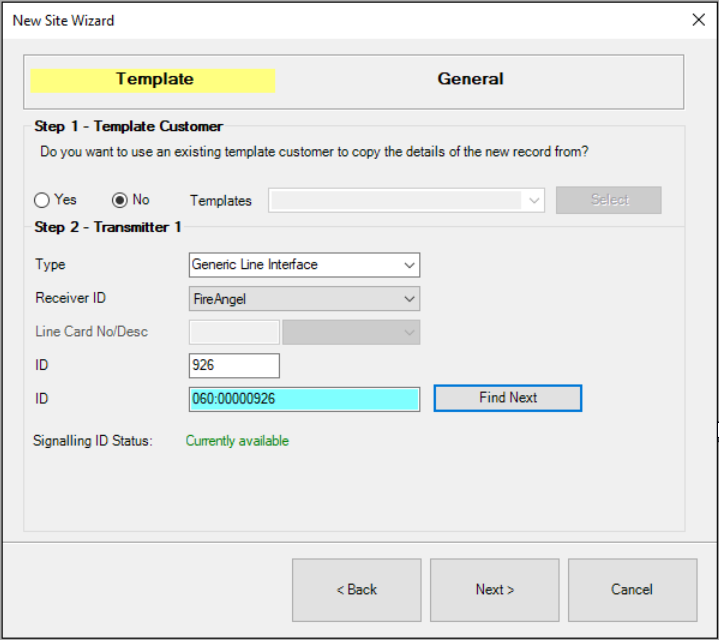
- Click Next.
Customer Name: Type any name.
Installer: Select one from the dropdown list.
Branch: Select Default Branch from the dropdown list.
Premises Type: Select Commercial from the dropdown list.

Click Detailed Site Info.
If you receive a "Customer record has not been commissioned" popup, click OK.
On the left sidebar, click Commissioning.
Click on the Commission button.
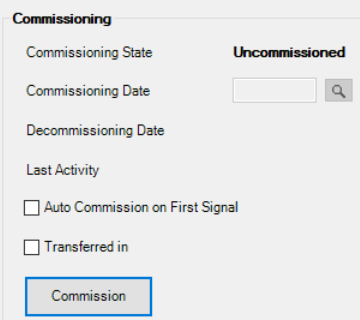
Click Yes on the pop-up window.
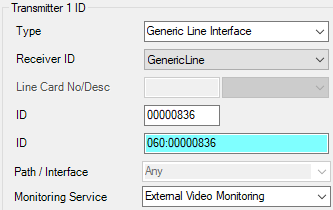
On the left sidebar, click Transmitter.
In the Monitoring service row, click the empty field -> choose External Video Monitoring from the list.
On the left sidebar, click Details.
Copy to clipboard or otherwise note down the last three digits of the serial next to Contract No. - it is going to be needed in AI Suite later on.

Save your changes by clicking the floppy disk icon in the icon bar at the top.
Connect Ultinous AI Suite with Sentinel
In the Ultinous AI Suite Web UI, select the Control Panel on the left sidebar -> Scroll down to E-mail and open it.
Configure an SMTP server according to the following:
Server name: The address of the server Sentinel is running on.
Server port: Set it to 9025.
Please refer to the E-mail sending guide for other options.
Click Save to submit your changes.
Go to Solutions -> Select the solution you would like to connect with Sentinel or create a new one.
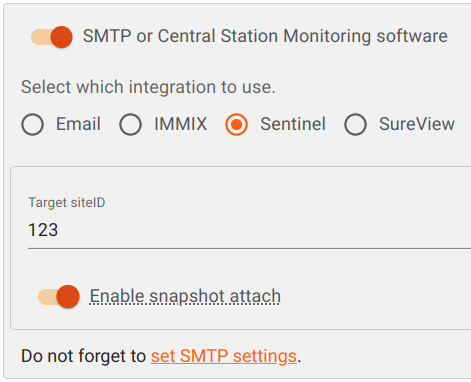
Scroll down to SMTP or Station Monitoring software -> tick its button.
Click the Sentinel radio button. Paste the last three digits of the serial you copied above to the Target siteID field.
Enable snapshot attach: Tick this button to include a snapshot image of the incident in the e-mail sent to Sentinel.
Enable video attach (for supported solutions): Tick this button to attach video, in
.mp4format: it begins 2 seconds before the corresponding incident, and stops 4 seconds after the incident's end timestamp. In the current version, the attached video file size does not exceed 18 megabytes.NOTE: If video sending is enabled and incidents are received very frequently and for an extended period of time, it may overload the system to a point where some video attachments could get delayed or not even included in their respective email.
Click Save to submit your changes to the solution. It is now ready to send events to be viewed in Sentinel!
Repeat steps 4-7 for each of your solutions you would like to send data to Sentinel.
List of solutions with corresponding subjects
Alarms received in Sentinel contain one the following as their subject, corresponding to a specific solution in Ultinous AI Suite - consult the table below for a complete list of them.
| Solution type in Ultinous AI Suite | Alarm subject in Sentinel |
|---|---|
| Crowd | Overcrowding |
| Intrusion | Area Entered |
| Hazardous Area | Area Entered |
| Multi Object Detection | Area Entered |
| Zone Crossing | Area Entered |
| Loitering | Loitering |
| Stopped | General Alarm |
| Wrong Direction | General Alarm |
| PPE | Equipment Fail |
| Fall Detection | Trouble |