Alarms via E-mail
Ultinous AI Suite allows you to send alarms via e-mail. The service can be set up to be used by either human beings or automated systems.
The following section walks you through the steps needed to have a working setup.
Sender Configuration
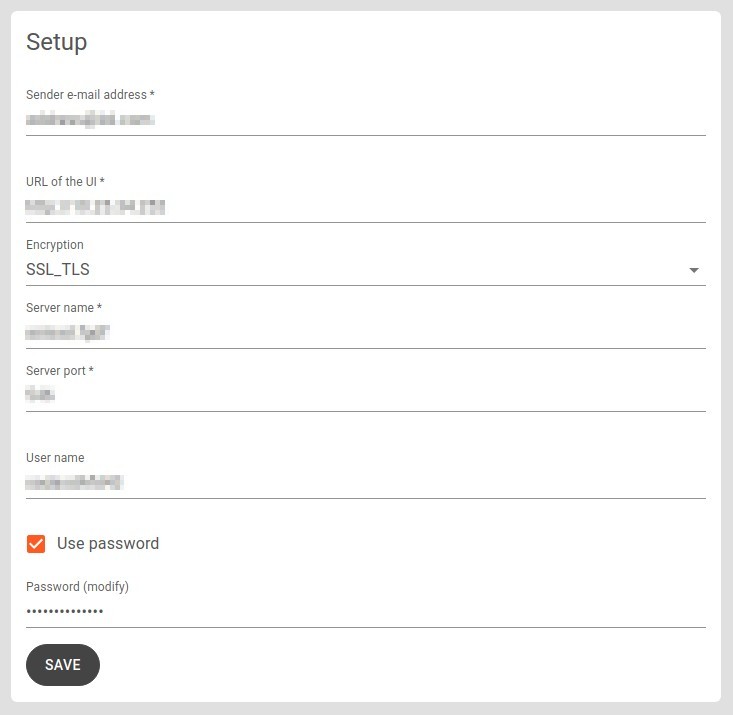
In Ultinous AI Suite, navigate to the System section of the Control Panel, then click the E-mail box.
Sender e-mail address: Type the e-mail address you would like to send the alarms from.
URL of the UI: This is the URL of the Ultinous AI Suite platform that you are using at the moment of configuration. It is filled in for you by default.
If the recipient(s) accesses Ultinous AI Suite from a different address than the sender (Note: this is and advanced, optional step - proceed only if you are confident), you may enter the URL of the Ultinous AI Suite the recipient is using.
Encryption (optional): Some e-mail providers require encryption. Two types can be set here: STARTTLS and SSL_TLS.
Server name: The name of the smtp server to send the alarms from. E.g. smtp.gmail.com.
Port name: Enter the port of the smtp server used to send the alarms from.
User name and Password (optional): If your e-mail server requires user credentials to send e-mail, you can optionally set them here. If you have a Gmail account, read below on how to set up its password.
Click the Save button.
NOTE: Custom CA certificates can be uploaded in the Trusted Certificates setting.
2-factor Authentication with Gmail
Starting from May 2022, Google will discontinue the support for logging in so-called "less secure apps": this effectively means any non-Google apps previously using the password itself will have to use an OAuth2 token instead.
To support e-mail sending with Ultinous AI Suite, you should create such a token - that Google calls an Application Specific Password or App Password.
You must have 2-Factor Authentication (2FA) enabled to create an App Password.
If you do, you can create App Password here.
Select "Mail" as application, "Other" as device. You'll be asked to name this device; enter "Ultinous AI Suite" (or something similar). You will receive a 16 character password, which is shown only once, so make sure to save it somewhere.
Then continue by setting up your e-mail settings in Ultinous AI Suite as follows:
Sender e-mail address:
your gmail addressEncryption:
SSL_TLSServer name:
smtp.gmail.comServer port:
465Username:
your gmail addressPassword:
the 16 character App Password you received, without spaces
Test email
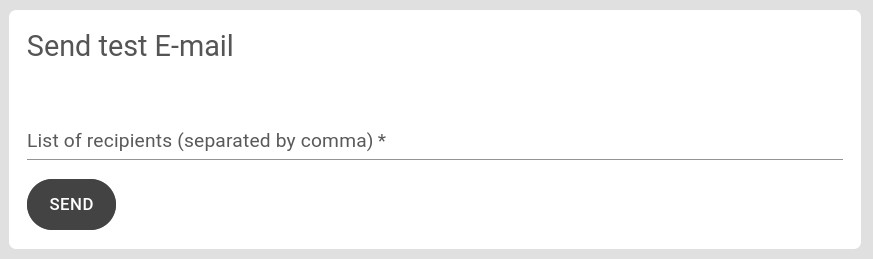
Once you are finished with the configuration, you can test it here. Type in the list of recipients, separated by comma, then click the Send button. If configured properly, the recipients should receive a test alarm shortly.
Recipient configuration
Each alarm can be set up to have different sets of recipients. Therefore the configuration of recipients is done individually, on an alarm-by-alarm basis.
Open the Solutions panel of Ultinous AI Suite.
Click the alarm you would like to setup with recipients and scroll down to the bottom of the page.
Tick the Enable email notification button.
Type in a list of the desired recipients, separated by comma.
Click the Save button.
E-mail format
The e-mail provides information about the alarm in three ways: in the subject, in the e-mail body, and as an attachment, in .json format. This attachment can be used by automated systems - the schema is the same as described in Custom integration.
The structure of the e-mail body is as follows:
- Alarm name
- Timestamp
- More info: Includes a link to the respective event's screen in the Ultinous AI Suite web interface.
The subject is formatted according to the template:
[Ultinous AI Suite notification] \<*Alarm name*\> [\<*timestamp*>\]